Followers

Friday, September 29, 2023

Event Scripts in FDMEE

 Event Scripts in FDMEE

Event Scripts, located in the Script Editor within FDMEE, are used to execute a task when certain events are carried out during the data load process. Each of the Event Scripts are customizable – users can use the scripts to perform a wide variety of tasks, such as send emails, run calculations, or execute a consolidation. There are nine different events and users can run the scripts before or after the event is executed, which makes a total of eighteen Event Scripts. The nine types of events are: Import, Calculate, ProcLogicGrp, ProcMap, Validate, ExportToDat, Load, Consolidate, and Check, with a Bef and Aft for each event. To create an Event Script, Select the type of event, whether the script will be run before or after that event, and click ‘New’.

Here are descriptions of each of the Event Scripts:

BefImport – This script runs before the Location is processed.

AftImport – Runs after the Location is processed and the data table is populated.

BefCalculate – Only for a Validation run and takes place before the Validation.

AftCalculate – Only for a Validation run and takes place after the Validation.

BefProcLogicGrp – Runs before Logic Accounts are processed.

AftProcLogicGrp – Runs after Logic Accounts are processed.

BefProcMap – Called before the mapping process for the data table begins.

AftProcMap – Called after the mapping process for the data table has finished.

BefValidate – Checks if the mapping process has been completed.

AftValidate – Runs after the BefValidate Script.

BefExportToDat – Called before the data file is created for Export.

AftExportToDat – Called after the data file is created for Export.

BefLoad – Called before the data file is loaded to the Target Application.

AftLoad – Called after the data file is loaded to the Target Application.

BefConsolidate – Called when a check rule is included in the location that is being processed. Can only be used if the Target Application is Hyperion Financial Management or Essbase.

AftConsolidate – Runs after the BefConsolidate Script.

BefCheck – Runs before the Check Rule.

AftCheck – Runs after the Check Rule.

One final thing, when creating an Event Script, make sure that there is a Script Folder within the Application Root Folder. Event Scripts are application specific, so they need to be kept in the Script Folder for the corresponding Application’s folder system.


Collected from https://hollandparker.com/blog/2016/04/21/event-scripts-in-fdmee/


Thanks,

Mady

Saturday, August 26, 2023

Data Management - same combination of all dimensions showing different data

 In Data Management, we found one issue today.

For same combination of all dimensions we were getting different numbers. for example, Dec-23 of all dimensions of same combination getting multiple records with different data. When we are checking other months with same combination, we were getting only one record. 

We verified Source file records, cleared data and loaded again, still same issue.

Loaded only one records for Dec-23, still getting 12-15 records with different data.

We didn't understand the issue, so we did  same steps in other environment with same source, there we were getting only one record.

So, Finally after checking all steps one by one we found one thing.

We verified Period Mapping where prior period key mentioned as 30-11-2022(by mistake) instead of 30-11-2023

Once we are update with this prior period key, we got results as expected only one record.


Thanks,

Mady

Data Management - Error in initializeFsGLCloudSource

In Data Management, we enabled drill through option and we were using that option using forms, smartview in our demo app. Drill through we are using to connect to ERP Cloud demo app, to check drill though. But ERP Team refreshed app and given another url (for example changed from DEV to Test URL)

Now, We updated Source System with URL, username and password. Test connection is successful.

But in Target application, we tried to refresh members that is also failed, 

2023-08-24 05:52:47,534 INFO  [AIF]: getOlapserver() :: <Essbase Server Host:port> = XXX.oracleoutsourcing.com:11448

2023-08-24 05:52:47,534 INFO  [AIF]: ExtractCubeMembers:Error::Cannot get olap application Information. Essbase Error(1051030): Application XXXXXXX does not exist

So, I tried to Initialize, there also it is giving error.

Log file:
2023-08-23 18:07:47,983 ERROR [AIF]: Error in initializeFsGLCloudSource.
2023-08-23 18:07:47,984 FATAL [AIF]: Error in initializeFsGLCloudSource
Traceback (most recent call last):
    File "<string>", line 83, in initializeFsGLCloudSource
    File "<string>", line 487, in executeFusionService
Exception: java.lang.Exception: Unable to find text data file for essRequestId: xxxxxxxx

When I am searching with Error in initializeFsGLCloudSource, I found below article in Oracle support.

Fusion GL Source System Initialization Fails with the "Error: java.lang.Exception: Unable to find txt data file for essRequestId: xxxxx" in EPM Cloud Data Management (Doc ID 2587854.1)

In this article it is saying to search for Chart of Accounts in scheduled processes and submit the cube once again. So ERP Team submitted one job Created General Ledger XXXXXX Cube, where we can see our Target application as cube. Once that job submitted, I did Initialize, it is completed. Refresh members also done. Drill through working fine using forms and smartview.

Thanks,
Mady

Data Export to File using Data Management - In old versions

 To export data to file using data management, we can follow below steps

Select in Target as Custom Application, and select Data Export to File

Once you select Data Export to File, it will ask for Data export file name, browse that file in which format you want export.

All Dimensions list will be shown as mentioned in the list. Check Target Dimension Class will be as Generic and update Account and remaining as UD1, UD2 etc.


Once we are done with other settings of how we need file, we can run the data load rule.

We will output with name whatever we mentioned in the settings.

we can validate the file by downloading it to local.

Thanks,
Mady


Monday, July 24, 2023

Data Management - Errors and solutions

 In Data Management, we will face below errors frequently. Check the errors, and find the solutions to check to trace the error and resolve the same. We may have different solutions, which I found is the below:

Data Management Issues:

BLANK:

Is log file mentioned as BLANK, check Import format File Type and Delimited. Check file and set as per file.

Amount=NN

Is log file mentioned as Amount=NN, NN - stands for Non-Numeric

check Import Format - File Type. Depends on file we can change this option form Numeric, All data type, Multi-column data etc.

Error: 3303

If log file mentioned as Error: 3303, If so, member mentioined is not there in outline or might be mentioned in Mapping.

Unmapped Dimensions in the file

Check the Workbench tab for validation error where you can find which members mapping is not correct.

Error Invalid Period:

Check the period mapping in file and data mapping, import format and also if period name in file is different than application, we need to check period mapping.

If the period is not picking up from POV, we need to setup file with period and year, depends on period format we can select explicit option to pick the period mapping with same format of file from Period Mapping - Source Mapping.


Thanks
Mady

Thursday, June 22, 2023

EPBCS - Data Management - Period Mapping update

 In Data Management Period Mapping, we don't have option to update bulk periods at a time. We have export option to export to excel but do not have option to import. Manually we have to update each period.

But we can do bulk update using Migration option in EPBCS, may be in On-premise also. I do not have On-premise environment to check that. So, steps to update in EPBCS as follows:

Go to Tools à Migration

Click on Data Management in the list

In Artifacts list, Select Global Setup Artifacts, Uncheck and select Period Mapping only.

Before this step, Try to add at least 2 periods in the list.

Click on Export to complete the migration.


Unzip the exported file, and go to FDMEE-FDM Enterprise Edition à resource à Global Setup Artifacts à Period Mapping.xml

Open Period Mapping.xml file in excel, It will list data as below


Use EOMONTH(date,0) function to get last date of each month. Drag the list up to year which we have in the application. we can prepare sheet in excel easily. 

Bind back zip file with Period Mapping.xml file. Upload the file and import the same.

You can find the periods updated in the Data Management.

Thanks,
Mady

Thursday, June 15, 2023

EDMCS - Create Subscription

How to create subscriptions? Subscription is used for??

Go to Views à Select the view à Click on 3 dots and select Inspect as shown in the below screenshot à Select Subscriptions and then click on Create à Select the dimension from the list.


Thanks,

Mady

EDMCS - Create Converters

How to create converters? Converter is used to move members from source to target.

Go to à Node Types à Click on 3 dots and select Inspect  à It will open the below page.

Select Converters à Click on Edit then Add à Select Target dimension.


To move, I mean drag and drop metadata with New Request from one view to another view, we have created Convertor in both Source and Target. 

For example, if the source is Main application and Target is FCCS or Plan, then we must create Convertor in both Node Types.

Thanks,

Mady

Tuesday, June 13, 2023

EDMCS - Create NodeSet

 To Create Node Set, just follow below steps:

Node Set:

Login to EDMCS à Select Node Set à Click on Create à Select dimension of the application.


Thanks,

Mady

EDMCS - Create Hierarchy Set

 To create hierarchy, just follow the below steps:

Hierarchy Set:

Login to EDMCS à Select Hierarchy Set à Click on Create à Select dimension of the application.


Thanks,

Mady


Thursday, June 1, 2023

EDMCS - Sample Metadata

 In EDMCS, We can update metadata into PBCS, FCCS, FCGL, Universal etc. you can find the list in the below screen shot.


Once login, Go to Application, Click on Register, select application type, enter name of the application, then you can add connection, dimension members etc.

Once application created, click on the three dots right side. In the list you can import, export options.

Select import option and choose the file of that particular dimension and click on import.

File format as follows:


Once import is done, you can verify the account dimension in the hierarchy.

Thanks
Mady


EDMCS - Application creation

 Loading metadata will be the first step of EDMCS after creating applications. So, We can create applications using below options

Once you login, Click on Applications


Click on Register on the left side. 

Select application type in the screen


For example, Select Planning, then update Planning application name and description and click on Next

Once you click on Next, you can create a connection to connect to Planning application or you can create later also. If you want to create connection, click Add. Otherwise click on Next and Click on Create.

You can see application in Applications tab now. If you want to modify Registration, you can click on 3 dots on the left of the side line, and select Modify Registration.

There you can see options like Inspect, Import, export, extract, load etc.


Will explain about each option in coming sessions.


Thanks

Mady


Wednesday, May 3, 2023

OIC - EPM - Data Load process in Data Management

 We can automate data management process, to run data load rule which is running successfully in data management. We can get doubt as we can schedule it in data management itself why we need OIC ??

Yes, you are correct we can schedule the data load rule to run on particular time using scheduling options in data management. But we can do more than that in OIC - Oracle Integration Cloud.

For example, If you want to run data load using just by changing Substitutional variables(start_Period, end_Period, import_mode, export_Mode), you can do that using OIC. If you are good at Groovy script, you can write a business rule also, to run Data Load rule by using EPM Automate commands.

OIC - to run data load rule by using substitutional variables:

  1. Login OIC, Go to Connections, create REST API connection to connect to Oracle EPM Planning URL.
  2. Go to Integrations and Click on Create to select Scheduled Orchestration. 
  3. Select RestAPI, to pull Substitutional Variables into OIC using Get option.
    https://docs.oracle.com/en/cloud/saas/enterprise-performance-management-common/prest/planning_get_a_subst_variable_for_app_2.html
  4. Select RestAPI, once again to run Data Load Rule.
    https://docs.oracle.com/en/cloud/saas/enterprise-performance-management-common/cepma/epm_auto_run_data_rule.html
    Or
    https://docs.oracle.com/en/cloud/saas/enterprise-performance-management-common/prest/fdmee_integration_jobtype_106x0fea7396.html
  5. You can add Wait Time, Notifications to send emails, While loops to send an repeat the tasks until completed also.
  6. Once you are done with setup, you can activate and submit now to run the Integration.
  7. You can check the status of integration in Monitoring -- Tracking tab
Thanks,
Mady

Monday, March 27, 2023

How to Load Multi-Column Data Load in Data Management

 If we get data in multi columns, for example as below:


We can use Multi-Column Numeric Method to load this for all months in one shot.

Mainly, Set below option as Multi Column - Numeric Data in Import Format.

In Import Format, Mappings, we need to specify Period Columns and mention as Driver name as Period


Now, Create Data Rule with above created Import Format.
To Mention Period - We will get an option like below as Column Headers

Here, we can select period as per columns in the Source File. In Target Options also Numeric Data only is fine. 
Note: If we change this option, can't get back Numeric Data Only option. Think twice before changing this option.

Now, We are set to load data, Update Data Load Mappings and Execute the Data Load Rule.

Thanks,
Mady


Tuesday, March 21, 2023

Clear cube in PBCS

 To do Defragmentation in On-Prem, we will do clear data and load data to remove fragmentation of the cube.

Like same, we can clear cube in EPM Cloud also using Clear cube option.

First, If we are planning to clear data we can clear data with below option: Navigate > Rules > Database Properties > Expand App name > Right click on the Cube name and can select Clear option you can select as shown below.

If we want clear cube completely, we can use below option. Navigate > Application Overview > Cubes > Actions > Clear Cube


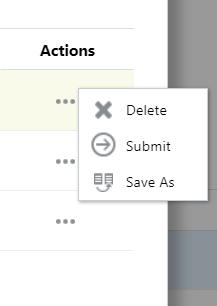
Click on Create and select the combinations how you want to clear data in that cube. Once done, go to actions as shown below, click on Submit


you can check the status of the same in Jobs. Navigate > Application Overview > Jobs


Thanks,

Mady

Wednesday, March 15, 2023

How to Reset Service in PBCS

 If we are facing issue with slowness or any abnormal and want to restart service of PBCS environment, we can do this process using EPM Automate.

– Login to EPM Automate

Usage: epmautomate login username password url identitydomain

Example: epmautomate login Mady_Admin P@ssWord12 https://myservice-mydomain.epm.us1.oraclecloud.com mydomain

– Run reset Service Command

Example: epmautomate resetservice “Users experience unacceptably slow connections”


Note: If you want to upgrade EPM Automate, you can use upgrade option.


Thanks,

Mady

Tuesday, February 21, 2023

EPM Cloud - Drill Through from SmartView

Drill Through we can do using 3 ways:
  1. Workbench data
  2. Data Form
  3. SmartView
Once you open SmartView, Right Click on Data Cell and Click on Drill through


Before this step we can select below to open Drill through in web browser or in new sheet

In SmartView >> Options >> Advanced >> Drill Through Launch


Once you click on Drill Through, you will get open in New Web Browser or In New Sheet.

If you face any issue regarding the above drill through option with Excel, you have to add extension to the browser. Please refer below document for the same.


Unable To Drill Through On SmartView Reports The information you’re about to submit is not secure (Doc ID 2825480.1)

Thanks,
Mady


EPM Cloud - Drill Through to File using Drill Through Definitaion in Calc Manager

We can drill back to Source using Workbench Data, Data Forms, and also using SmartView

Using Workbench data, we can drill through to Source, steps documented in below link:

https://hyperion-mady-epm-cloud.blogspot.com/2023/01/drill-through-using-data-management.html

Using Data Form, Go to Navigate - Rules - Select Database Properties as showing below


Expand EPM Cloud 

          "Application Name"

                 >> Expand application name    

                        >> Right click on Cube name 

                                >> Select Drill Through Definition 


Click on + sign and Enter URL name, XML, and click Add Region. Enter the combination of Data Form.  

XML Contents:

<?xml version="1.0" encoding="UTF-8"?>
<foldercontents path="/">
  <resource name="Drill Through to source" description="" type="application/x-hyperion-applicationbuilder-report">
    <attribute name="name" type="string" xml:lang="ja" value="ソースにドリル・スルー"/>
    <attribute name="name" type="string" xml:lang="en" value="Drill Through to source"/>
    <attribute name="name" type="string" xml:lang="zh_TW" value="鑽研至來源"/>
    <attribute name="name" type="string" xml:lang="tr" value="Kaynakta Detaya Git"/>
    <attribute name="name" type="string" xml:lang="ko" value="소스로 드릴스루"/>
    <attribute name="name" type="string" xml:lang="no" value="Gjennomdrilling til kilde"/>
    <attribute name="name" type="string" xml:lang="nl" value="Drill-through naar bron"/>
    <attribute name="name" type="string" xml:lang="iw" value="תחקור למקור"/>
    <attribute name="name" type="string" xml:lang="cs" value="Přejít ke zdroji"/>
    <attribute name="name" type="string" xml:lang="th" value="ดริลล์ผ่านไปยังที่มา"/>
    <attribute name="name" type="string" xml:lang="it" value="Esegui drill-through nell'origine"/>
    <attribute name="name" type="string" xml:lang="fr" value="Exploration amont vers la source"/>
    <attribute name="name" type="string" xml:lang="ru" value="Детализация до источника"/>
    <attribute name="name" type="string" xml:lang="ro" value="Detaliere la sursă"/>
    <attribute name="name" type="string" xml:lang="zh_CN" value="穿透钻取到源"/>
    <attribute name="name" type="string" xml:lang="fi" value="Siirry lähteeseen"/>
    <attribute name="name" type="string" xml:lang="ar" value="الاستعراض التشعبي إلى المصدر"/>
    <attribute name="name" type="string" xml:lang="sv" value="Borra genom till källa"/>
    <attribute name="name" type="string" xml:lang="pt_BR" value="Fazer drill-through para origem"/>
    <attribute name="name" type="string" xml:lang="pl" value="Drąż skrośnie do źródła"/>
    <attribute name="name" type="string" xml:lang="fr_CA" value="Forage transversal jusqu'à la source"/>
    <attribute name="name" type="string" xml:lang="de" value="Drillthrough zur Quelle"/>
    <attribute name="name" type="string" xml:lang="hu" value="Áthatoló részletezés a forrásig"/>
    <attribute name="name" type="string" xml:lang="es" value="Obtener detalles hasta origen"/>
    <attribute name="name" type="string" xml:lang="da" value="Bor igennem til kilde"/>
    <action name="Drill Through to source" description="" shortdesc="">
      <url>./aif/modules/com/hyperion/aif/gl/main/FdmeeMain.jsp?module=aif.drilldown&amp;sso_token=$SSO_TOKEN$&amp;rcp_version=$RCP_VERSION$&amp;$ATTR(ds,id)$</url>
    </action>
  </resource>
</foldercontents>

Add Region:
@List(<Row members, Column Members>, Fix members etc)

Click Ok. 

Now Check the Data Form you can find this combination cell like below. Symbol in the cell right corner top.

You can drill through using SmartView also with same Data form. you can find the same in next blog.


Thanks,

Mady

Reference :

Monday, January 30, 2023

Drill through using Data Management from EPBCS to ERP Cloud

 Drill through using Data Management from EPBCS to ERP Cloud

Source System

  •         Go to Setup -> Source System -> Click on Add
  •         Mention Source System Name, Description is optional
  •         Then Select Source System Type as Oracle ERP Cloud
  •         Update Drill Through URL with ERP Cloud URL. 
  •         Click on Configure Source Connection and Enter credentials in the popup.
  • Click on Test Connection and wait for configuration successful message.

     Now, Click on Initialize to connect to the Source System. This process will monitor in Process details tab. Check process is successful or not. This process will create below process in Target application.

  •      Create Location, select Import Format. and Save

    Go to Workflow, Data Load Mapping first, select Location, Period and Scenario. Then Map all source members with Target dimension members. Mainly we are doing this process for Drill back, So, in Account dimension, map all members correctly.

  •     Create Data Load Rule, Execute the rule.

Once it is successful, you can check workbench to verify the data.

Validation:

Once Data Load Rule is successful, we need to validate Drill through process.

       Go to Workbench -> Data Column

        Right click on data column and click on Drill Through to Source Option

Once we click on this, it will take to Source System page.

Other than this, we can test the same from DATA FORM also.

Thanks,

Mady


Friday, January 13, 2023

OneStream - Application Back up automation

++++++++++++++++++++++++++++++++++++++++++++++++++++++++++++++++++++++++++++++++

Imports System

Imports System.Data

Imports System.Data.Common

Imports System.IO

Imports System.Collections.Generic

Imports System.Globalization

Imports System.Linq

Imports Microsoft.VisualBasic

Imports System.Windows.Forms

Imports OneStream.Shared.Common

Imports OneStream.Shared.Wcf

Imports OneStream.Shared.Engine

Imports OneStream.Shared.Database

Imports OneStream.Stage.Engine

Imports OneStream.Stage.Database

Imports OneStream.Finance.Engine

Imports OneStream.Finance.Database


Namespace OneStream.BusinessRule.Extender.XFR_ExportAppMetadata

Public Class MainClass

'------------------------------------------------------------------------------------------------------------

'Reference Code: XFR_ExportAppMetadata

'

'Description: Extender business rule that all application metadata to a zip file for the current application.

' The files are written to the application Data Mgmt Export folder in the file share directory.

'

'Usage: Can be executed from Business Rule editor or run as part of a Data Management sequence.

'

'Created By: <Your name>

'Date Created: <xx-xx-xxxx>

'------------------------------------------------------------------------------------------------------------

Public Function Main(ByVal si As SessionInfo, ByVal globals As BRGlobals, ByVal api As Object, ByVal args As ExtenderArgs) As Object

Try

Select Case args.FunctionType

Case Is = ExtenderFunctionType.Unknown, ExtenderFunctionType.ExecuteDataMgmtBusinessRuleStep

'Prepare the Stage Data Extract File path

Dim configSettings as AppServerConfigSettings = AppServerConfig.GetSettings(si)

Dim folderPath as String = FileShareFolderHelper.GetDataManagementExportUsernameFolderForApp(si, True, configSettings.FileShareRootFolder, si.AppToken.AppName) & "\" & DateTime.UtcNow.ToString("yyyyMMdd") & "\MetadataExtracts"

if Not Directory.Exists(folderPath) then Directory.CreateDirectory(folderPath)

Dim filePath as String = folderPath & "\" & DateTime.UtcNow.ToString("yyyyMMdd") & " " & si.AppToken.AppName & ".zip"

If File.Exists(filePath) Then File.Delete(filePath)


'Set the extract options

Dim xmlOptions as New XmlExtractOptions

xmlOptions.ExtractAllItems = True


'Execute the Metadata Extract

Using dbConnFW as DBConnInfo = BRAPi.Database.CreateFrameworkDbConnInfo(si)

Using dbConnApp as DBConnInfo = BRAPi.Database.CreateApplicationDbConnInfo(si)

Dim zipBytes as Byte() = ApplicationZipFileHelper.Extract(dbConnFW, dbConnApp, Nothing, xmlOptions)

'Append the contents of this workflow profile to the extract file

Using FS As New FileStream(filePath, FileMode.Append, FileAccess.Write)

'Create a binary writer, and write all bytes to the FileStream at once

Using BW As New BinaryWriter(FS)

BW.Write(zipBytes)

End Using

End Using

End Using

End Using

End Select

Return Nothing

Catch ex As Exception

Throw ErrorHandler.LogWrite(si, New XFException(si, ex))

End Try

End Function

End Class

End Namespace

++++++++++++++++++++++++++++++++++++++++++++++++++++++++++++++++++++++++++++++


Reference link: 

https://community.onestreamsoftware.com/t5/Rules/Automating-Application-Back-up/td-p/7980


Thanks,

Madhusudhan

Thursday, January 12, 2023

PBCS - Migration - with dimension name change

To change dimension name while doing Migration from One Environment to Another.

1. Download the snapshot zip file from existing pod on your local machine

2. Unzip the snapshot file on your machine location

3. Download a utility named fart.exe (find and replace text)

4. Run the command in the following way 

a. C:\>fart.exe -r -c -- C:\Backup_Snapshot\* "Dimension A" "Dimension B" 

5. The above will replace all occurrences of Dimension A with Dimension B

6. There will be one dimension file in the folders named Dimension A.csv, rename it to Dimension B.csv

7. Zip the entire folder again, the structure should resemble that of original snapshot zip file

8. Import that structure in new environment and perform migration. 

9. It will succeed with some access related failures, that you can ignore

10. Open the application, validate the forms etc, check rules and Data Integration execution


Validation:

 - Data Forms, Dashboards, Navigation Flows - Migration will be successful

 - Dimensions - Members not same - Mainly in Account dimension some members missing.

 - Rules - In some rules may not change dimension name in Agg function mainly I observed.

 - In Calculation Manager, check Database properties - Member blocks, block size, no.of clocks etc

 - Data Management - Data Load Rules not showing up, Please validate all settings: Source system, Target Application, Import Format, Location, Data Load Rule, Data Load Mapping etc.


Thanks,

Madhusudhan

Sunday, January 8, 2023

EPM Planning Cloud - Application Migration and Export artifacts

 Migration from one environment to another. Take Snapshot to take entire application backup, or If you want to separate artifacts also you can export and take backup with this option - SnapShot.

  1. Download Snapshot from Existing Pod
  2. Upload Snapshot to New Pod
  3. Once upload is completed, right side go to Actions >> Import 
  4. Once Import is completed, then validate application below points

  • Check Refresh Database
  • In Rules, Click on Database Properties. Check Enterprise View and check General, Statistics, Dimension members for all cubes.

We can Export dimension members using below steps:

Navigate >> Application >> Overview >> Dimensions >> Export/Import -- using this option we can export or import dimension members.


Thanks,

Madhusudhan